Using Docker Compose to Containerize a T3 Stack App with a Database Instance
What is the T3 Stack?
The T3 stack is a Next.js-based TypeScript stack featuring Prisma as the ORM, tRPC for GraphQL-esque type-safe APIs for client-server communication, NextAuth.js for authentication, and Tailwind CSS for utility-first styling. You can read more about how a T3 app operates from my previous post.
Why Docker?
I like to view Docker as a way to automate your whole software deployment process with just a few config files. At its core, Docker is a containerization platform that helps you package and build your application stack for seamless and consistent deployments — "Build Once, Deploy Everywhere".
Docker lets you define the dependencies and setup procedures of your projects in a structured and sequential manner in a Dockerfile that is placed inside your application repository. This is what a minimal Dockerfile for a Next.js application would look like:
# Define the base image - in this case it is a Node.js runtime on top of the Alpine Linux distribution
FROM node:14-alpine

# Set the working directory - your apps location in the container's filesystem
WORKDIR /app

# Copy your dependency list into the container's filesystem
COPY package*.json ./

# Install the dependencies from the previous list
RUN npm install

# Copy your entire app from the host filesystem to the container's filesystem
COPY . .

# Build the Next.js app for production
RUN npm run build

# Set environment variable to "production"
ENV NODE_ENV production

# Expose the port on which Next.js runs (by default it's 3000)
EXPOSE 3000

# Start the Next.js app
CMD ["npm", "start"]
The Dockerfile tells the Docker Engine how your application's container image should be built. Here are some of the things that you can define in a Dockerfile:
- Your base image
- Your dependency manifest and installation commands
- Location of your application code
- Environment variables
- Any command to run in the container filesystem
Image, or container image, is the binary representation of your whole software package built from what is defined in the Dockerfile — from the operating system to the application start command. Images can be pushed (published) into cloud container registries like Docker Hub, Harbor, Amazon ECR, and many others, where they can then be pulled into deployment environments (servers/VMs/serverless instances).
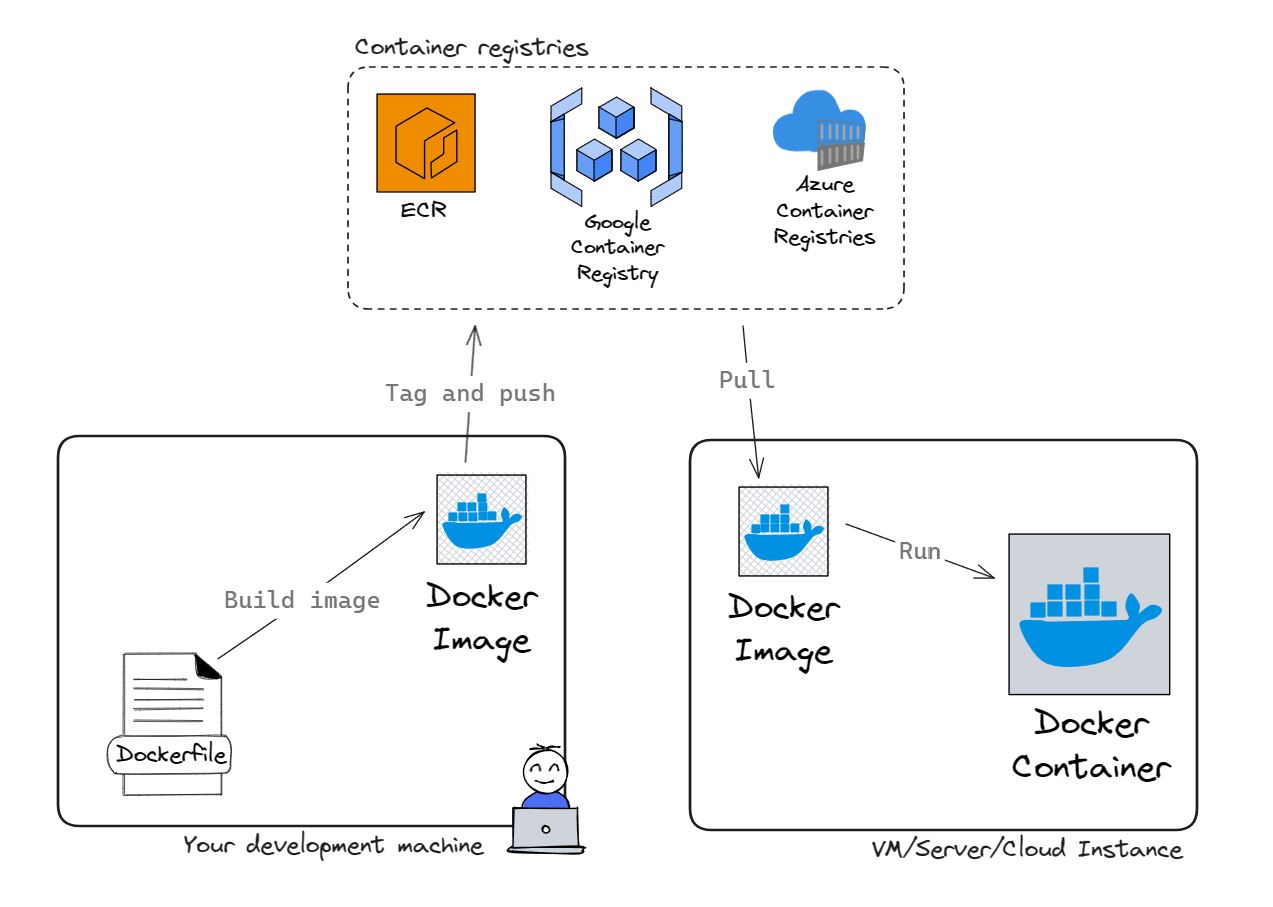 Build image, tag and push to cloud registry, pull into VM, and run container.
Dockerizing a T3 application
Dockerizing the T3 application is pretty straightforward. In fact, the T3 team has laid out a documentation on how to Dockerize a T3 application. This is what the Dockerfile looks like:
##### DEPENDENCIES

FROM --platform=linux/amd64 node:16-alpine3.17 AS deps
RUN apk add --no-cache libc6-compat openssl1.1-compat
WORKDIR /app

# Install Prisma Client - remove if not using Prisma

COPY prisma ./

# Install dependencies based on the preferred package manager

COPY package.json yarn.lock* package-lock.json* pnpm-lock.yaml\* ./

RUN \
 if [ -f yarn.lock ]; then yarn --frozen-lockfile; \
 elif [ -f package-lock.json ]; then npm ci; \
 elif [ -f pnpm-lock.yaml ]; then yarn global add pnpm && pnpm i; \
 else echo "Lockfile not found." && exit 1; \
 fi

##### BUILDER

FROM --platform=linux/amd64 node:16-alpine3.17 AS builder
ARG DATABASE_URL
ARG NEXT_PUBLIC_CLIENTVAR
WORKDIR /app
COPY --from=deps /app/node_modules ./node_modules
COPY . .

# ENV NEXT_TELEMETRY_DISABLED 1

RUN \
 if [ -f yarn.lock ]; then SKIP_ENV_VALIDATION=1 yarn build; \
 elif [ -f package-lock.json ]; then SKIP_ENV_VALIDATION=1 npm run build; \
 elif [ -f pnpm-lock.yaml ]; then yarn global add pnpm && SKIP_ENV_VALIDATION=1 pnpm run build; \
 else echo "Lockfile not found." && exit 1; \
 fi

##### RUNNER

FROM --platform=linux/amd64 node:16-alpine3.17 AS runner
WORKDIR /app

ENV NODE_ENV production

# ENV NEXT_TELEMETRY_DISABLED 1

RUN addgroup --system --gid 1001 nodejs
RUN adduser --system --uid 1001 nextjs

COPY --from=builder /app/next.config.mjs ./
COPY --from=builder /app/public ./public
COPY --from=builder /app/package.json ./package.json

COPY --from=builder --chown=nextjs:nodejs /app/.next/standalone ./
COPY --from=builder --chown=nextjs:nodejs /app/.next/static ./.next/static

USER nextjs
EXPOSE 3000
ENV PORT 3000

CMD ["node", "server.js"]
How do we include our database?
You might notice that the above Dockerfile does not contain any instructions on how to package a database instance along with the application itself. It assumes that you already have a database URL that can be plugged in as the environment variable on instantiation. This is great if you already have a database running on the cloud, but what if you want to deploy your database instance in the same remote machine as your application?
In this instance (😉), one solution is to pull a database image from public registries like Docker Hub and manually run, configure networking, volumes, and a few other manual configurations to make sure that both your application and database containers play nicely with each other.
A more convenient solution is to use Docker Compose. It is a tool for basic multi-container orchestration for single-host deployments. It lets you define your containers (i.e. services) and configure their dependencies, networking, environment variables, shared volumes, and a few other features. You can think of Docker Compose as a second-degree abstraction over our Dockerfile, as these configurations are normally done manually when running the docker run command.
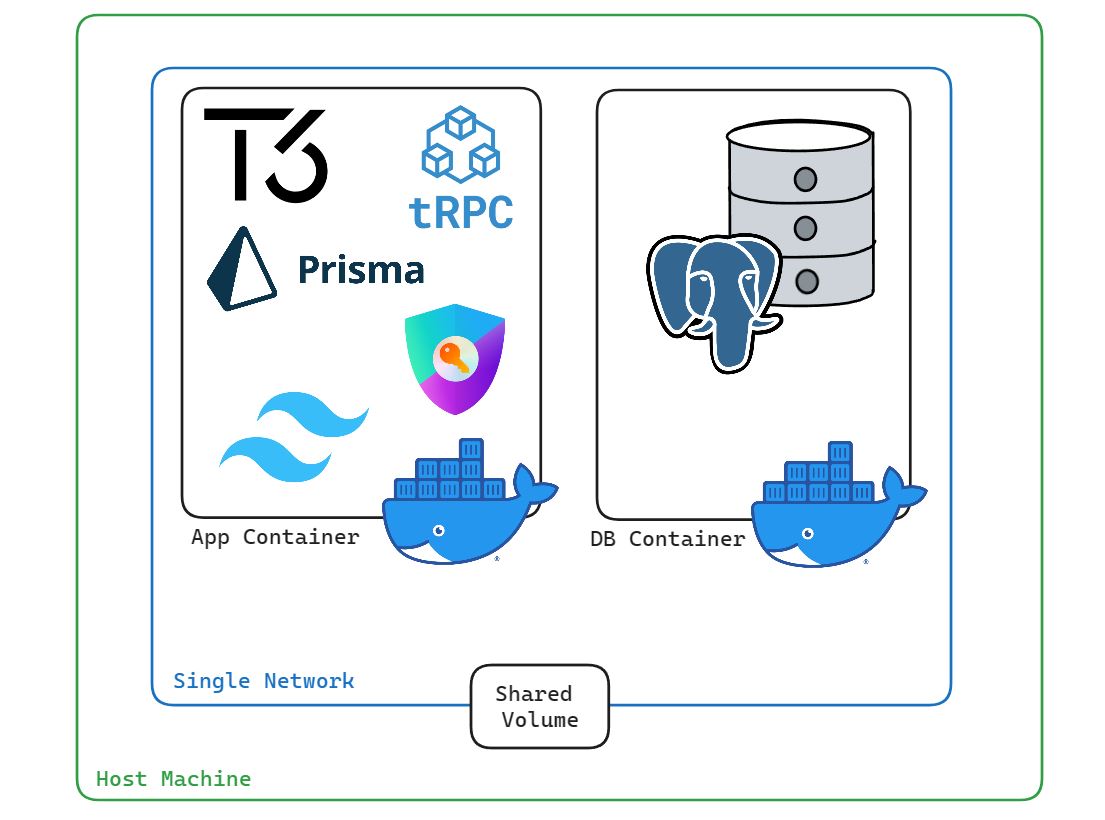 Docker Compose automatically places both application and database containers within a single isolated network. Connections from the host machine will need to be done through an exposed port.
As we want to configure a database instance that can be deployed alongside our application, we can use Docker Compose to build a separate container for our database and run them along with our application container in an orchestrated manner. This saves us from having to tediously run multiple Docker commands sequentially on our own and reduces rooms for errors.
Using Docker Compose
This is a base docker-compose.yaml for the T3 stack provided in their official documentation.
version: "3.9"
services:
  app:
    platform: "linux/amd64"
    build:
      context: .
      dockerfile: Dockerfile
      args:
        NEXT_PUBLIC_CLIENTVAR: "clientvar"
    working_dir: /app
    ports:
      - "3000:3000"
    image: t3-app
    environment:
      - DATABASE_URL=database_url_goes_here
We can adjust this file to register our database instance as a separate service called db:
version: "3.9"
services:
  db:
    platform: "linux/amd64"
    image: postgres:latest
    ports:
    - "5432:5432"
    environment:
    - POSTGRES_USER=postgres_user
    - POSTGRES_PASSWORD=postgres_pw
    - POSTGRES_DB=t3_db
    volumes:
    - db_data:/var/lib/postgresql/data
    healthcheck:
      test: ["CMD-SHELL", "pg_isready -U postgres_user -d t3-db -h db"]
      interval: 10s # retry after the database is ready
      timeout: 5s
      retries: 5
  app:
    platform: "linux/amd64"
    build:
      context: .
      dockerfile: Dockerfile
      args:
        NEXT_PUBLIC_CLIENTVAR: "clientvar"
    working_dir: /app
    ports:
      - "3000:3000" # app
    image: t3_app # name of image
    env_file:
      - .env # gets all app-related env var
    depends_on: # make sure db completes set up before running app
      db:
        condition: service_healthy

volumes:
  db_data: # persistent data
Pay attention to the following changes that we have made to the original docker-compose.yaml:
- We have added a service called
db, which has thepostgres:latestas the base image. By default it will get the image from Docker Hub, unless you prefix this with a container registry host of your choice. - We added the environment variables for the database. Ideally, this should be obtained from an untracked
.envfile. - We set a volume called
db_dataatservices.db.volumesandvolumes, and mapped it to/var/lib/postgresql/datain the container filesystem. This is to ensure that the data is persistent on the host even when the containers are stopped. - We used the
pg_isreadycommand to perform database healthchecks during the initial container run. - We added
services.app.depends_on.db.condition: service_healthyto only start the application container if the database container has been successfully started.
We also need to make some changes to our Dockerfile to allow schema initialization with Prisma:
##### DEPENDENCIES

FROM --platform=linux/amd64 node:16-alpine3.17 AS deps
RUN apk add --no-cache libc6-compat openssl1.1-compat
WORKDIR /app

# Install dependencies based on the preferred package manager

COPY package.json yarn.lock* package-lock.json* pnpm-lock.yaml\* ./

RUN \
 if [ -f yarn.lock ]; then yarn --frozen-lockfile; \
 elif [ -f package-lock.json ]; then npm ci; \
 elif [ -f pnpm-lock.yaml ]; then yarn global add pnpm && pnpm i; \
 else echo "Lockfile not found." && exit 1; \
 fi

##### BUILDER

FROM --platform=linux/amd64 node:16-alpine3.17 AS builder
ARG DATABASE_URL
ARG NEXT_PUBLIC_CLIENTVAR
WORKDIR /app
COPY --from=deps /app/node_modules ./node_modules
COPY . .

# ENV NEXT_TELEMETRY_DISABLED 1

RUN \
 if [ -f yarn.lock ]; then SKIP_ENV_VALIDATION=1 yarn build; \
 elif [ -f package-lock.json ]; then SKIP_ENV_VALIDATION=1 npm run build; \
 elif [ -f pnpm-lock.yaml ]; then yarn global add pnpm && SKIP_ENV_VALIDATION=1 pnpm run build; \
 else echo "Lockfile not found." && exit 1; \
 fi

##### RUNNER

FROM --platform=linux/amd64 node:16-alpine3.17 AS runner
WORKDIR /app

ENV NODE_ENV production

# ENV NEXT_TELEMETRY_DISABLED 1

RUN addgroup --system --gid 1001 nodejs
RUN adduser --system --uid 1001 nextjs

COPY --from=builder /app/next.config.mjs ./
COPY --from=builder /app/public ./public
COPY --from=builder /app/package.json ./package.json

COPY --from=builder --chown=nextjs:nodejs /app/.next/standalone ./
COPY --from=builder --chown=nextjs:nodejs /app/.next/static ./.next/static

# Copy Prisma directory

COPY --from=builder /app/prisma ./prisma

USER nextjs
EXPOSE 3000
ENV PORT 3000

# Run custom startup script defined in package.json

CMD ["sh", "-c", "npm run start:migrate:pod"]
In the final line of the code snippet above, we run a script called start:migrate:pod to serve our application. This custom script is defined in package.json under scripts:
{
 scripts: {
   ...
   "start:migrate:pod": "npx prisma migrate deploy && node server.js"
   ...
 }
}
This script performs the database schema migrations, generate Prisma client, and runs the application server.
By running the schema migrations on container start, we can ensure that the database is reachable from the application container and has a consistent state with Prisma's shadow database. The schema migrations are done based on your T3 project's prisma/schema.prisma file and the migration history in prisma/migrations.
Building and deploying the application
At this point, our application and database containers are ready to be built and run on the remote server. In short, here's what we need to do next:
- Build the image.
- Push the image to an online registry.
- Copy required files into the remote server and SSH into it.
- Pull the container images into our remote server.
- Run the containers.
First, we'll build the Docker images using docker-compose build. This will trigger Docker Compose to build all the container images as they're defined in the docker-compose.yaml file. We can then confirm that the images has been built using docker image ls:
REPOSITORY                      TAG           IMAGE ID       CREATED           SIZE
docker.io/library/postgres      latest        92038733e03b   4 seconds ago     400MB
docker.io/library/t3_app        latest        30843ca0daf7   4 seconds ago     100MB
Next, we have to run docker-compose push to publish the images we built to a container repository. This is based on the prefix of the application image defined in docker-compose.yaml. If you did not specify a host, it will default to Docker Hub (docker.io).
After that, we can start setting up our server for the deployment. We need to copy these important files into the server filesystem:
.env(there are best practices in handling.envfiles in deployment environments, but we'll omit them now for the sake of brevity)docker-compose.yaml
You can use the scp command-line tool to copy these files into a project directory in your remote server:
> scp C:/path/to/project/.env C:/path/to/project/docker-compose.yaml <remote_user>@<remote_host>:~/<remote-project-dir>
Next, in the remote server, you can now run docker-compose pull in the /remote-project-dir to pull the image based on the image name specified in the docker-compose.yaml. If you didn't prefix the image name (services.app.image) with a container registry host, it will search for this image in Docker Hub. You may be prompted to provide your login credentials for the container registry if you haven't logged in yet.
Finally, you can run docker-compose up -d to run your container, with the -d flag to run it in a detached state so that your terminal session is not tied to the container logs. We can confirm that the containers are running by using docker ps, which will output something like the following:
CONTAINER ID   IMAGE                                COMMAND               CREATED         STATUS          PORTS                         NAMES
4dc2219f7a2c   docker.io/library/postgres:latest    postgres              4 minutes ago   Up 13 seconds   5432:5432/tcp                 db_1
5da2s1a673yb   docker.io/library/t3_app:latest      sh -c npm run sta...  4 minutes ago   Up 13 seconds   3000:3000/tcp, 2222:22/tcp    app_1
You can verify that the application has been successfully deployed by connecting to the IP or FQDN of your server along with the application port 3000 from your local browser.
Et voila
You can see how Docker Compose makes it easy to deploy your solution stack on a remote server in a reproducible manner. Whenever your application code or dependency changes, you can redeploy the application by simply running docker-compose build and docker-compose push on your development machine, then running docker-compose pull and docker-compose up -d on your deployment machine. It can't get any easier than this.
Well, actually, it can! You can take the automation a step further by setting up a CI/CD pipeline that automatically builds images, push them to a registry, and deploys them in a remote server — based on changes made to a branch on a source code repository like GitHub. This requires the use of pipeline agents that help trigger jobs based on a set of predefined conditions. This is out of the scope of the post for now, but keep in mind that there are ways to optimize this even further.
I hope that this post gave you a better picture on the deployment flow of a T3 application with a database instance using Docker Compose. Thank you for your read!